Bazza

Sunday, November 26, 2006

DIY - Dining room

Removed the old carpet today and took it to the local tip. Had a bit of an accident today though, Joy (my youngest) with her constant question of 'Can I help?' had a fall. I told her she could give the coving a coat of paint and sorted her out with a small container of paint and a brush. All I heard from the kitchen was a crashing sound as the step ladders had gone through a loose floor board, I rushed in to find her trying to pick herself up whilst screaming, and covered in white paint. I sorted her out and checked all her cuts and bruises and got her to rinse all the paint out of her mouth, luckily she only had a few bruises and nothing was broken, well, apart from the floor board. I then proceded to nail the bloody floor boards down, unfortunatley, they were the ones I had taken up and hadn't nailed down when I had finished, and forgot to inform her they were loose, so I then went on a guilt trip, big time. Strange, I am always telling them to be careful of things when i am working, like watch out there is a sharp blade there or be careful i have removed the floor boards, seems the one time I forget, then the accindent happens, well, I suppose its not really an accident, more of neglegence on my part. lesson learned.

Saturday, November 25, 2006

DIY - Dining room

Its definatley coming together now. I have finished off the skirting, the coving is now done also, and I have started the sanding of the skirt boards, spent some time today putting the coving up, had a bit of dificulty on the curved wall, I could not get the coving to follow the shape of the wall, so I decided to cut it into smaller pieces, it seemed to work quite well although I will need to spend some time blending it all together but that shouldn't be to difficult.


As you can see I have the architraves on as well now. The picture below shows the coving, well, its actually cornice, it was the largest type there was in B&Q (another plug... I'll have to see about some gift vouchers.. he he), the fact that its quite large helps as the ceilings are very high and normal coving would have looked real small.

Well, I was trying to take a picture of the chimney breast which had suffered from some shrinkage cracks, which I have repaired, however, it seems when ever the camera is out Hollie pops up, little poser..!! :)

Sunday, November 19, 2006

DIY - Dining room

Well, all the plastering in the dining room is now finished, next job is the coving. We saw the coving we want at B&Q, just need to get it picked up and back home, I'll have to see if I can borrow the works van as the coving is 3m in length, which won't fit into our Renault Clio!! I can also get started on the Skirting as soon as the plaster has dried out. At least all the really dirty, messy, and dusty work is done now, so it should start to come together a little quicker now which is good as we are getting a little bit fed up with living in a building site.

Sunday, November 12, 2006

DIY - Under the stairs

Coming along well, only have the woodwork and the decorating to do in there now, so i will concentrate on the dining room now. Having the space under the stairs done is useful, as i can move some of the stuff out of the dining room and give myself a little more space to work in.


Finished off the archway as well.


To get the skim beads to fit the arch I cut the bead along one edge, making a cut every inch or so, this will make it start to curve naturally, the first picture below shows the type of skim bead i use for this and the second image shows the skim bead in place with the cuts clearly visible. Once I had tacked the bead in place I start to fill in the underside of the arch with some plaster or bonding, depending on what I have mixed at the time, making sure that it isn't proud of the profile. If using plaster I will usually just give the filling a brush finnish and wait for itto harden before adding any more plaster to it, however, plaster shrinks more than bonding does, so you end up going back to it more often just to add another coat.


I'm thinking of doing some time-lapse photography of me plastering one of the walls, will look into that over the coming week.

Saturday, November 11, 2006

Bathroom


I did say i would post some images of the bathroom, I don't have any before pictures on this computer, they are on my other computer which is not setup at the moment. I have also added a couple of links to two small videos of the bathroom.

http://www.youtube.com/v/Dv7lu2RZuoQ
http://www.youtube.com/v/QjFueDL9XSg

Been busy every night this week, and been working all day today, managed to get quite a bit done under the stairs, and also skimmed some of the dining room, mostly the alcoves. I have removed the old door casing between the kitchen and the under stairs bit, didn't seem much point having a door casing there when there has never been a door on it since we moved in, I assume the people before us must have removed it. Daphne wanted an arch way to replace it, so I made one and have put that in place. The dry-lining has been done under the stairs and the floating has been finished off and is now ready for skimming. Still need to put the skim beads on the arch, I'll try and get that sorted tomorrow. Its now starting to look a bit better in here now, things are finally comming together, I still think there are a few weeks of work left for me to do untill its completely finished.


The new Arch.


The underside of the stairs prior to plastering

And after plastering.

Tuesday, November 07, 2006

DIY

Well, that was interesting, I only had enough sand and cement for two mixes, and it didn't quite cover the area, oh well, I'll finish the rest some other night.

Monday, November 06, 2006

DIY - Kitchen


I haven't really started work on the kitchen, although it still looks like a bomb site, we have lived with it for a while now. We had a new backdoor and window put in due to the old wooden ones being rotten. When the guys came to change the window an door, it was only then that I realised they were holding up a rotten wooden lintel, the whole lot nearly came down with three coarses of brick work. I got them to prop the old lintel until I could go and get one the next day. Once I had the lintel I started to take the lose bricks away from above the old one, once I had removed them I quickly fitted the new steel box lintel, then rebuilt the brickwork.

Won't be starting this room untill after christmas, well I think so anyway, plus I need to save up some cash for the new kitchen units and appliances.

I will try and get some pictures posted up of the bathroom, now that was a transformation, took a while but was happy with the finish.

bye for now..

DIY - Under the stairs


Got the rest of the old plaster off from under the stairs, took a while as the brickwork was so uneven. Finished off all the boarding tonight, its now ready for floating. Had to re-wire the light as it was not installed correctly, this means I won't be able to get the light working until I can connect it into the kitchen light circuit. It did give me a chance to move the light switch to the side of the doorway, as before it was in the kitchen, which meant you had to walk through the space to get to the switch. Whoever re-wired it the first time did it for ease and speed and not for praticality. I was lucky with the boarding here, all the off cuts from the dining room ceiling were trimmed to fit, I could have just used a full board or two, but it makes me feel better when I can save a little money :-)

One of the walls is so uneven I may give it a scratch coat of sand and cement, then dot and dab some boards on it with drywall adhesive. Not made my mind up just yet as to what I will do, need to give it a day or two, maybe I'll decide when it comes time to do the work.

Going to try and float the other wall (on the left of the picture) tomorrow night when I get home from work, we'll have to see how I feel.

Saturday, November 04, 2006

DIY - Under the stairs

Managed to put some noggins in under the stairs, this will give me something to screw the plaster boards to. Still need to remove some old plaster in here.


DIY - Dining Room

This is a picture of the dining room window before I started floating the wall, this was taken a few days ago as I had already put the angle beads on during one evening last week.

Managed to get quite a bit done today with the help from my daughters Hollie and Joy, they did all the mixing of the sand and cement. To be honest, I would not have got as far as I did without them.

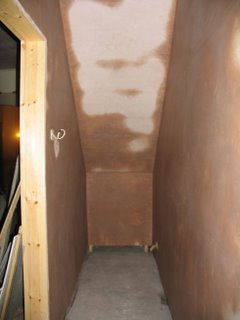
This is how the walls look now, had to coat it quite thick in places, but it has turned out well.

Had to take the power sockets off, I re-positioned this socket as it was, for some strange reason, a lot higher than all the others. Because I have to plaster around them I have to make sure I don't eletricute myself, so I connect the cables into a vinyl block (30 amps or higher), then cover it all with electrical tape, then, just to make sure, I put it into a plastic bag and tape that up also, this makes for a waterproof cover.


Wednesday, November 01, 2006

Have added a link to my favourite site regarding the construction of a flight simulator, this is a dream of mine which will become my hobby once all the other jobs have been done. That the problem with hobbies, they always take a back seat when it comes to other household jobs.

oh well, such is life..

I will start a different blogg once this hobby is up and running.