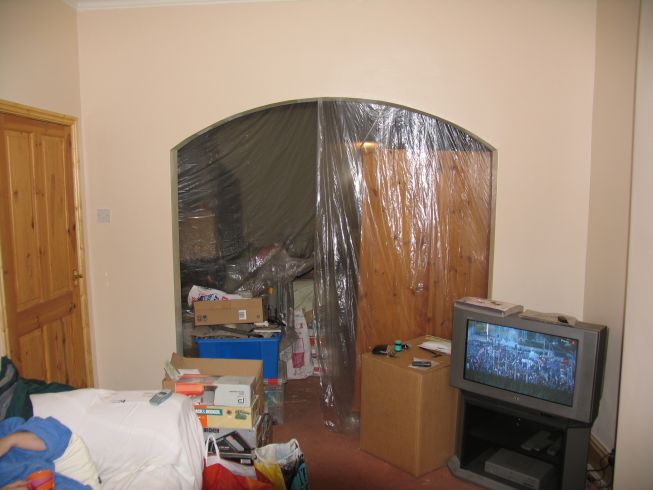
Bazza

Tuesday, October 31, 2006

DIY - Dining Room

couple of pics showing before and after of the ceiling.

Monday, October 30, 2006

DIY - Dining Room

Well, i have managed to plaster the ceiling and the chimney breast, also removed the woodwork from around the window which unearthed another load of work. The window needed foaming around the frame for a start and i put a new peice of wood in above to hold a few bricks up, the main lintel is behind the new peice of wood, the new peice only holds a few bricks. Fixed a new window board on and removed the rest of the loose plaster, which didn't really leave much left.

Fitted a new pendant on the ceiling just as a temporary measure so i have some light in their to work with, as the nights are dark when I get home from work now. have put a new double socket back box on the side of the chimney stack, this will house the one which was originally on the front of the chimney stack, I need to switch the power off and move the electrics, not easy doing that in the dark, so that may have to wait till next weekend, unless i find my torch!!

Been checking out the other walls and the condition of the plaster, i'm begining to think that the person who previously plastered them was not a plasterer, if he was, then he was drunk that day.

Friday, October 27, 2006

Wedding


Found these on my computer, thought i'd post them.

Group Photo, Back row from left to right:
Andrea, Kathy, Bob, Judy, Maddy, Dave (Bother), Mandy (Sister)
Front row:
Collette (Niece), Mum, Emma (Daughter), Me, Daphne (Wife), Hollie (Daughter), Luke (Nephew), Joy (Daughter)
Little one at the front is Jake (Nephew)

Wednesday, October 25, 2006

DIY - Under the stairs


Don't have any pictures prior to starting this job, but needless to say it was a mess... first problem was the fact that underside of the stair case was covered with thin ply wood, but the joints were covered with skrim (the self adhesive skrim, see pic of the dining room ceiling) which is used before plastering, not for the purpose it had been used, so i had to remove everything. the walls were covered with plaster board but were stuck on with plaster and nails rather than using proper dry-lining adhesive. So all that had to come off, and the plaster underneath was a mess, so that has to come off too.

Ive already built the wall at the bottom of the staircase and boarded it ready for skimming, i'll use special plaster board screws to attach the plaster board, not a good idea banging nails in when the plaster work above the staircase has already been done, i'd probably end up making cracks everywhere...

As you can see the walls still need floating with a motar mix, however, the new door casing does no protrude far enough away from the brickwork, so i will glue and tack a 1/4" x 1" peice of wood around the frame giving me a better chance to float it out straight.

Monday, October 23, 2006

DIY - Dining Room


What can i say... This room is currently in a real mess, actually there is a type of order going on here, its called caotic!!... LOL..

the majority of the plaster which has been taken off is on the chimney stack, basically, the old cement has perished due to the heat from the original fire place. The old plaster was hacked off back to the original brickwork, the angle beads (often refered to as float beads, these are the wider type, the thin type are known as skim beads, you can also get the thin ones in a solid galvanized steel rather then the expanding metal type and these are for corners on stud type walls), are stuck on with carlite bonding, you can use a motar mix, but its easy to knock the bead off when floating it out if you intend to float the wall the same day.

The other reason for removing the plaster back to brick work is mainly due to the cock-up from the previous plasterer, i'm not sure whether it was the previous owner or not, but judging by the handy work i have found in this house, it wouldn't suprise me. For instance, they had put a new ballistrade in upstairs on the landing, and instead of glueing in the spindles, the dick head had nailed through the hand rail and into the top of the spindles... beggers beleif... so as you walked down the landing, running your hand along the rail you could feel the nails sticking up... I couldn't salvage anything from that cock-up, and had to replace the lot.

The trouble with removing old plaster is the fact that you cannot plaster upto loose plaster, so you have to continue to remove the old stuff until you reach solid plaster, unfortunatley sometimes you can end up with just a little bit of original plaster left on the wall.. at this point its usually more economical to remove the rest and just start from scratch.

I really did not want top drop the ceiling, as the mess makes your house un-livable, so its easier and cleaner to over board the entire cieling. To do this I first made 2 channels along the ceiling to expose the joists above, stuck a nail in the center of each one then tied a peice of string between them and mark the ceiling, this gave me a line i could measure to for cutting the plaster boards. One thing to remember is don't nail through the boards where the channel is!!

Again, all the wood work is being replaced in this room, the old gas fire has been removed and the hole bricked up. The window is staying but all the old wood work around it will be going, I'm going to build it up then plaster it.

I'll o some more pictures once i have some plaster on the walls and the ceiling.

Holiday - Cornwall


Just thought I'd throw this one in, from left to right, Daphne, Joy, Hollie, and Emma. Picture was taken whilst on a camping holiday in Cornwall, we were in a small fishing village on the south coast called Mevagissey.

DIY - Lounge


Never took any pictures of the lounge prior to working on it, never had a great deal to do in this room. Re-skimmed some parts and ripped out the old meter cupboard and built a new one. All the skirting, door casing, window board, and architraves have all been replaced with new wood and varnished instead of painting it white. The original coving, around 100 years old, was in a bad state but I managed to repair the damaged bits and now it looks like new.

The biggest problem I had was the fact that DPC (Damp proof course) had been bridged by the person who replastered after the DPC injection, this is bad enough, but the idiot used carlite browning, which is like a sponge to water, so we had a few damp patches until I managed to remove all the browning and replaster with a motar mix with waterproofer addative, and kept this above the layer of injected brick work, which is how it should have been done in the first place.

The fireplace was knocked through and an electrical output was put inside the opening, I also put a fused isolation switch on the face of the chimney breast so the fire can be isolated for any maintenance. Got the fire from Hombase as an ex display, gave it a clean up and hey presto looks like new, only £100 cheaper.

some of the sockets have needed new back boxes due to the damp (they were rusted to hell), also found one which was actually stuck to the brickwork with plaster instead of beaing fixed with screws, some things I have found really amazes me. All socket faces have been replaced with new fittings. The light switch still had the original wooden backbox! needless to say its also been replaced with a new metal one.


the carpet will be replaced once the house is complete and ready for going on the market.

Austria Holiday


Ok, this is the last image I am going post regarding Austria, this one is of the local housing in Hallstatt, this place was really nice, i guess its the typical image people have of austria.

Austria Holiday


This picture gives a better feel for the scale and size of these mountains.

Austria Holiday


Another interesting picture of lake Traunsee.

Austria Holiday


Went to Austria earlier this year, this is what the brochure has to say about it :

Lake Traun, or "Traunsee" is the deepest and one of the most spectacular lakes in Austria. The village of Traunkirchen is set in one of the most picturesque locations, jutting out into the lake offering perfect views. The 11th Century church is the central feature and is elevated above the shimmering lake, whilst the nearby market town of Ebensee, lying on the southern shore offers a wide range of activities. Both provide an ideal base for exploring this wonderful lake. Take a boat to Gmunden on the northern tip of the lake or take a train to a World Heritage Sight Hallstatt or spa town Bad Ischl. If you prefer to explore locally, the lake, forests and neighbouring mountains offer boating, walking and cycling. Lake Traunsee has something for everyone!

We stayed at the 'Hotel Post', nice place and friendly people.

Pic = Lake Traunsee, Took this one evening whilst walking by the lake side, i loved the colour of this scene.

(If anyone would like a copy of the full size images (approx. 3 meg in size) then drop me a message telling me which one. Please Note: They cannot be used for any commercial gain whatsoever)