Hi again,
Lots of things have happened since the last post. The drains have all been lined and renewed where necessary, this was all done on the house insurance which saved us a lot of money. The yard still looks a mess but thats a job for another time.
Well I have started on the kitchen, well, I have been working on it for the past month or so.
So, where are we upto you ask? or maybe not, well, it's starting to come together, we have had a few ups and downs, but things always seem to work out right over time.
OK, Started by stripping out the old kitchen which is good fun because you can vent plenty of anger whilst being productive!!! After stripping the old kitchen out the walls needed stripping off back to brick, this wasn't very difficult as the old plaster was completely shot, and just fell off on its own in places. The major headache in doing all this is the fact we still have to live around it, so I had to keep the cooker and hob for as long as I could before removing it, and the washing machine and dishwasher also had to be constantly worked around.
One good things is that I can re-wire the room to how we want it, the original wiring was not that far from where I decided things had to be, but some of it would have been condemed it was that bad. One of the sockets had a metal backbox screwed to the surface of the tiles! and the mains cable was just tacked to the surface of the wall! even the 32amp cable supplying the cooker was just hanging out of the cooker switch, which was mounted behind one of the cabinets which had its back cut out so you could isolate the cooker. Needless to say that the room was completely re-wired correctly, with the cables sunk into the walls with protective capping over them.

This is Hollie getting stuck in with a brick hammer. The new brickwork behind her is where I had to remove a window which was unfortunately in the place where the boiler will be hung eventually. The Boiler in its current position actually blocked half of the window anyway, and I could never figure why it was put there in the first place! but I guess not everyone is logical.
 Hollie really enjoys destroying things! not sure if I should be worried about this or not! She loves working with me on the house to the point where she kept talking about having her own toolkit, so I bought her one, a fifteen year old girl with her own toolkit! maybe its a first. She has even done some joinery for me, I got her to join 2 pieces of the kitchen units together using dowels, glue and clamps! hopefully this means she won't be ringing me up every 5 minutes to fix things when she gets older, if I could just my other 2 duaghters trained up I'd be on a winner..
 Above: Most of the walls have been stripped back now, and the ceiling is also now stripped back to the floor joists above ready for plaster boarding.
 Had to rebuild this part of the wall as it decided to fall apart when I was removing what I can only describe as concrete from the face of it, even found the old iron brackets which were originally put in for the sink! Do you like the new sink? one cold tap and a bowl, hence the reason we needed to try and keep the dishwasher online as much as possible, for some reason Daphne was not impressed with the minimalist look.
Whilst the walls were back to brick I hired a DPC injector and injected the two external walls, it had already been done, but they had done it below the floor joists which was two bricks lower than the external DPC, so I injected at the same level inside as the external DPC, makes more sense on a solid wall (no cavity).
Next step was sorting the ceiling out, had a few issues with trying to re route the pipe work for the bathroom above, the old pipes seemed to go everywhere! so making the route as straight forward and as short as possible was a priority, especially as we have a combi boiler. to make it easier I decided to drop the ceiling by 2 inches, so a got some 3x2 wood and bolted these accross the joists.


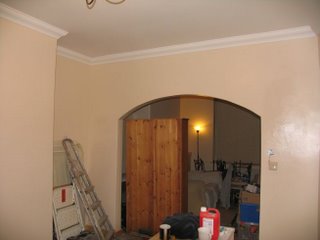
The arch wall was given a scratch coat of sand and cement to biuld it out as it needed a lot to make it look anything like straight.

Fixed a peice of 3x2 to the face of the box lintel I put in above the window and door to bring it out to the level of the brickwork, keeps the wall continuos and looks a lot better once the complete wall is plastered. The wall where the boiler will be situated has had a scratch coat of sand and cement, and will get another coat before plastering, because I'm putting the boiler there it needs to be sand and cement and cannot be dry linned.
 Ceiling now boarded, apart for a small peice above the new position of the boiler, this is so I can fit the boiler and then bring the pipework to exactly where I want it.

 The majority of the flooring in the kitchen is down now. I did have to rip up the old floor boards before starting the kitchen as the boards under the washing machine and dishwasher were rotten, years of leaks never being fixed had soaked right through the boards, the were so bad in places i could push a screw driver through them without any real pressure. Luckily the joists underneath were fine, but I treated then anyway as I had a large can of the stuff and I wont need it anymore, so they got a good soaking.


 This is Hollie getting stuck in with a brick hammer. The new brickwork behind her is where I had to remove a window which was unfortunately in the place where the boiler will be hung eventually. The Boiler in its current position actually blocked half of the window anyway, and I could never figure why it was put there in the first place! but I guess not everyone is logical.
 Hollie really enjoys destroying things! not sure if I should be worried about this or not! She loves working with me on the house to the point where she kept talking about having her own toolkit, so I bought her one, a fifteen year old girl with her own toolkit! maybe its a first. She has even done some joinery for me, I got her to join 2 pieces of the kitchen units together using dowels, glue and clamps! hopefully this means she won't be ringing me up every 5 minutes to fix things when she gets older, if I could just my other 2 duaghters trained up I'd be on a winner..
  Above: Most of the walls have been stripped back now, and the ceiling is also now stripped back to the floor joists above ready for plaster boarding.
 Had to rebuild this part of the wall as it decided to fall apart when I was removing what I can only describe as concrete from the face of it, even found the old iron brackets which were originally put in for the sink! Do you like the new sink? one cold tap and a bowl, hence the reason we needed to try and keep the dishwasher online as much as possible, for some reason Daphne was not impressed with the minimalist look.


 Ceiling now boarded, apart for a small peice above the new position of the boiler, this is so I can fit the boiler and then bring the pipework to exactly where I want it.


